Setup NAT Network for QEMU in Mac OSX
Step-by-step guide on setting up a bridged NAT network for QEMU in MacOS

I am working on a really cool project where we have to manage virtual machines that are launched through QEMU.
The project is meant to run in Linux, but as I (and all my colleagues) have a Mac to develop, we wanted to be able to run the project under Mac. Yes, I know QEMU's performance on Mac sucks!
We couldn't use QEMU's user mode network stack due to its limitations.
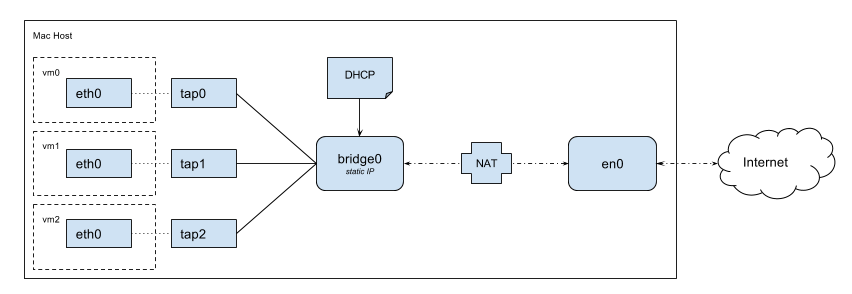
We needed to use TAP interfaces, the machines should be able to acquire the network configuration through DHCP and should be NATted.
An schema of how I wanted things to be is as follows:
Enable TAP interfaces in Mac
The first issue I stumbled upon is the fact that Mac does not have native support for TAP interfaces.
In order to have TAP interfaces in Mac we need to download and install TunTap.
Once it is installed, we are going to see a list of TAP nodes installed with the scheme /dev/tapX.
TunTap determines the max number of possible TAP interfaces and sets them up.
Creating the bridge interface
Once we are able to use TAP interfaces, we need to create the bridge where we can attach them.
This is really straight-forward in Mac.
For a temporal bridge we just need to issue the following command with elevated privileges:
$ sudo ifconfig bridge1 create
The next step is to configure the address for that newly created bridge.
Which IP we give it, will depend on the network we want to use for our VM network.
As an example, I will use the 192.168.100.0/24 network, so I will assign 192.168.100.1 to the bridge.
It will act as the default gateway for all the virtual machines, that is why we need to assign that IP statically.
$ sudo ifconfig bridge1 192.168.100.1/24
Packet forwarding and NAT
The next step to reach our goal is to configure our Mac so that the packets that arrive from the bridge1 interface are routed correctly.
We also need to NAT these packets as otherwise they won't find their way back.
Enabling packet forwarding is really easy, we just need to execute:
$ sudo sysctl -w net.inet.ip.forwarding=1
For the NAT we need to create a pfctl configuration file where we state the rule that will do the NAT.
In a file we write the following:
nat on en0 from bridge1:network to any -> (en0)
This rule tells pfctl to NAT packets that:
- Go through
en0(you should replace this interface for the one connected to the internet) and - Have source IP from the network range associated to
bridge1(here goes the bridge name of our VM network)
The address to use for the NAT is indicated after the ->.
We need to put the interface connected to the internet between parenthesis.
The parenthesis are important because it forces the evaluation of the address associated with the interface each time the rule is applied.
If we don't add it, the address to use will be resolved at load time and if it changes, the used address will be incorrect.
Now we need to enable the pfctl with the given rule.
$ sudo pfctl -F all # This flushes all active rules
$ sudo pfctl -f /path/to/pfctl-nat-config -e # Enable pf with the config
Setting up the DHCP server
Before setting up the virtual machine, we need to set up the DHCP server so the VM will be able to acquire the network configuration easily.
Fortunately, Mac OS comes with a DHCP server installed by default and the only thing we need is to set it up and start it.
The server is bootpd and is located under the /usr/libexec/ directory.
The DHCP server reads the configuration from the file /etc/bootpd.list and we need to edit it.
The bootpd.plist file has 3 main sections (detailed explanation in the official documentation):
- Root dictionary keys: this properties are used to control the behavior of the daemon as a whole.
- Subnets property: An array of the subnetworks that the DHCP server has associated.
- NetBoot property: This is used to configure the netboot options.
We are going to be interested in the first two sections as they are the ones that are needed to have the DHCP service up and running.
Here's the file as we need it:
<?xml version="1.0" encoding="UTF-8"?>
<!DOCTYPE plist PUBLIC "-//Apple Computer//DTD PLIST 1.0//EN" "http://www.apple.com/DTDs/PropertyList-1.0.dtd">
<plist version="1.0">
    <dict>
        <key>bootp_enabled</key>
        <false/>
        <key>dhcp_enabled</key>
        <array>
            <string>bridge1</string>
        </array>
        <key>netboot_enabled</key>
        <false/>
        <key>relay_enabled</key>
        <false/>
        <key>Subnets</key>
        <array>
            <dict>
                <key>name</key>
                <string>VM NAT Network (192.168.100.0/24)</string>
                <key>net_mask</key>
                <string>255.255.255.0</string>
                <key>net_address</key>
                <string>192.168.100.0</string>
                <key>net_range</key>
                <array>
                    <string>192.168.100.2</string>
                    <string>192.168.100.254</string>
                </array>
                <key>allocate</key>
                <true/>
                <key>dhcp_router</key>
                <string>192.168.100.1</string>
                <key>dhcp_domain_name_server</key>
                <array>
                    <string>8.8.8.8</string>
                </array>
            </dict>
        </array>
    </dict>
</plist>
Let's drill down to the important elements in the xml file.
The dhcp_enabled key in the root dictionary is used to state which interfaces we want to associate the DHCP with.
We must here add the bridge interface name, otherwise the DHCP service won't listen to the DHCP requests on that interface.
The other required thing we need to do is add an entry in the array associated with the Subnets key.
Each entry is a dictionary that will describe a subnetwork to be used by the DHCP service.
The following is a description of the main keys used above (again, for the complete list see the documentation):
- name: A string just to give the subnetwork a human readable aspect.
- net_address: this is the subnetwork base address. In our case
192.168.100.0. - net_mask: the subnetwork's mask.
- net_range: which range in this subnetwork is managed by the DHCP server.
The value of this property is an array that contains two strings: the lower and upper bound of the addresses to manage.
In our case, we want the DHCP to manage all the hosts but the one assigned to the host, then our range is:192.168.100.2-192.168.100.254. - alocate: this boolean property tells the DHCP server whether to assign or not IP addresses from the range. We must set it to true.
The other two keys are used to push configuration to the DHCP clients.
We want to push the default gateway as well as the DNS, for that we use the dhcp_router and dhcp_domain_name_server option.
Now that the configuration has been set up, we need to start the DHCP server.
To do that, we just execute $ sudo /usr/libexec/bootpd -D.
This will launch the server in the background with DHCP capabilities on.
If we want to have it in the foreground and see how it is working, it can be launched using the -d flag.
QEMU and interface setup
The last thing to do is to launch the virtual machines and correctly set up the attached interface so that it is correctly attached to the bridge.
We are going to be using a TAP interface setup in QEMU using a virtio NIC.
We cannot use the bridge setup in Mac due to the inexistent qemu-bridge-helper for the platform.
To configure the virtio device we need to use the following command line arguments: -net nic,model=virtio.
Here is where we would also specify the MAC address for the interface if we want to.
The command line argument specification to setup the interface as TAP is like this:
-net tap[,vlan=n][,name=name][,fd=h][,ifname=name][,script=file][,downscript=dfile][,helper=helper]
From those arguments we are interested in 2 of them in particular, script and downscript.
The files given in those arguments are executed right after the TAP interface is created and right before the TAP interface is destroyed, respectively.
We need to use those scripts to attach and detach the interface from the bridge.
The scripts receive one command line argument with the name of the interface involved.
We need to create two scripts:
qemu-ifup.shwill be used as the start script and will attach the interface to the bridge:
#!/bin/bash

ifconfig bridge1 addm $1
qemu-ifdown.shwill be used in thedownscriptto detach the interface from the bridge before it is destroyed:
#!/bin/bash

ifconfig bridge1 deletem $1
All that's left is start the VMs and enjoy the newly created NAT network.