Share Your Thoughts: Setting Up a Blog Using Ansible and Ghost
Owning the platform you use to express yourself is becoming more important in these times. Use this guide to setup a ghost blog using ansible.


In these times when censorship is rising and tech giants are not just playing the role of facilitators but are getting more and more into the moderation sphere, the safest and way to put your word out is to host your own platform.
Hosting your own blog service can seem to be a daunting task, but using the right tools it can become a relatively easy one.
I've found the ghost platform to be one of the most intuitive and easy to use ones. In the past I've used Jekyll and was happy with it, but ghost gives you nicer features and, for the majority of the people, a superior user experience.
I've published my ansible ghost role with the intention of making the deployment of a ghost site easier to accomplish. The role itself does not setup the blog completely, but merely takes care of the ghost service itself: following the single responsibility principle explained in my previous blog post Structuring an Ansible Repo for Personal Infrastructure.
The objective of this post is to give an idea of (1) how this role works and (2) how to use it in order to have a functional blog platform. The intention of showing how the role works is so that the role itself can be replaced with manual actions if desired.
End Goal
What we want to end up having is a site running ghost that can be accessible under a TLS connection. This site should also be easy to back up so that if anything happens with our VPS it can be easily bootstrapped again somewhere else with little effort.
As I've mentioned several times we are going to use the dockerized version of the service. The Docker community maintains an official ghost image in DockerHub. The image leverages SQLite for storage and that makes it pretty much self-contained without requiring any external services in order to run. The only thing it takes is a mounted directory or volume to make the content generated persistent across restarts.
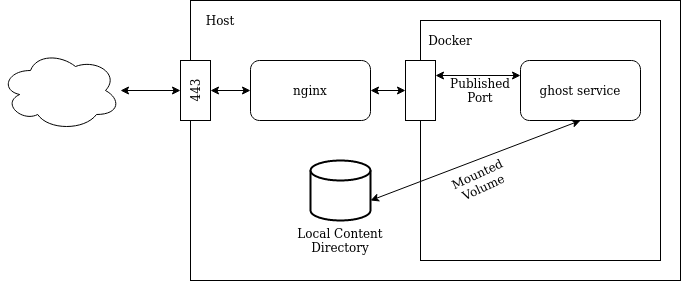
Once we have a container running the image it will basically have an open port where ghost will be serving requests. One way of making it accessible to the outside world is to directly publish the port by mapping a host's port to the container. But this has a couple of drawbacks: it will leave the blog without TLS (ghost itself doesn't handle that) and also we would either have to choose to run the blog in a non-standard port or not run any other service in the same standard port.
Instead of doing that, what we are going to use is a reverse proxy, in this case nginx. It will be the one receiving the connections on port 443, handling the TLS side of it and then forwarding the requests to the ghost service using a only-locally-reachable port.
To summarize this is a schema of how the setup is going to look like:
Getting the Blog Service Up
By using the role I've published, it makes it really simple to configure a ghost site.
The only thing needed is to add the role to the host where we want to run it and change some variables. The ones that need to be setup are: ghost__host, ghost__base_dir, and ghost__configs.
The ghost__host variable is used to setup the ghost server to use as the base for the URL. The ghost__base_dir is the location that the role will use to create the config files and also where the persistent data generated by the blog will be stored.
The ghost__configs is used to push configs into the ghost service. It must be a dictionary with keys matching ghost configuration (See ghost documentation for possible values) in the environmental value format. The most common item to setup is the mail configuration.
This is usually how using the role would look like:
- hosts: my_blog.example.com
    become: yes
    roles:
      - ...
      - role: salessandri.ghost
        vars:
          ghost__base_dir: '/var/myblog'
          ghost__host: 'my_blog.example.com'
          ghost__configs:
            mail__from: '"My Personal Blog" <blog@example.com>'
            mail__transport: 'SMTP'
            mail__options__host: some_stmp
            mail__options__port: 465
            mail__options__secureConnection: true
            mail__options__auth__user: '{{ myblog_mail_username}}'
            mail__options__auth__pass: '{{ myblog_mail_pass_vault }}'
And just like that, after being applied, there will be a ghost service running in a docker container with a port being published on 127.0.0.1:2368.
All the different things that can be tweaked on the role can be found in the role's documentation.
What Goes On Under The Surface
What the role does to get the blog setup is pretty dumb. It creates the directory structure for the content and configuration by using the ghost__base_dir variable as its root. The structure itself is really simple, it creates a subfolder content where the persistent data generated by the blog will be stored.
After this it creates a file that is used to configure the ghost service. This file is nothing more than a key-value pair file that which will be used to populate environmental variables for the ghost docker container. As ghost is able to be fully configured through env variables, this is the simplest method to do so.
Finally, a docker container is setup to run the ghost service. A port is published in order to make the service accessible from outside docker. The proper volume mounting is done to guarantee that the blog persists data in a known location. The config file built on the previous step is used to populate environmental variables of the container.
Setting up the plumbing
Up until now we have a ghost service running but it is only accessible from the host. Now we need to address all the necessary items to make it accessible from anywhere and in a secure manner: using TLS.
The first thing that should be done is to generate the certificate. For that, I will not be using any Ansible roles as I haven't found any satisfactory ones yet. There's a chicken-and-egg problem between having a webserver configured and the certificate creation using certbot that I will deep dive some time in the future.
To create the certificate just install Certbot in the host and create the certificate by any means. I highly recommend using the webroot mechanism and having a default nginx configuration that serves a standard location. This way, we can keep this and have the certificates renewed automatically without hassle. This should install the certificate and related files in a folder like /etc/letsencrypt/live/<site-name>/.
Once we have the certificate created we can proceed with the nginx reverse proxy setup. I recommend using the official nginx Ansible role.
To summarize how to use that role: we will be enabling the generation of site configurations by setting the role's variable nginx_http_template_enable to true and then passing a set of configurations to be generated through the nginx_http_template variable.
The site's configuration we want to create is one that will act as a reverse proxy for SSL connections targeted to the blog's hostname. If it receives requests on the non-SSL port it should issue a redirect to the same URL but using HTTPS. Finally, we want to serve the SSL renewal requests /.well-known/ from the challenge folder.
To achieve this we need to add an entry to nginx_http_template with the following content:
nginx_template_config:
  my_blog:
    conf_file_name: my_blog.conf
    conf_file_location: /etc/nginx/conf.d/
    servers:
      my_blog_https:
        server_name: my_blog.example.com
        listen:
          listen_all_ipv4_https:
            ip: '0.0.0.0'
            port: 443
            ssl: yes
            opts:
              - http2
          listen_all_ipv6_https:
            ip: '[::]'
            port: 443
            ssl: yes
            opts:
              - http2
        ssl:
          cert: /etc/letsencrypt/live/my_blog.example.come/fullchain.pem
          key: /etc/letsencrypt/live/my_blog.example.com/privkey.pem
          protocols: TLSv1 TLSv1.1 TLSv1.2
          ciphers: 'ECDHE-ECDSA-CHACHA20-POLY1305:ECDHE-RSA-CHACHA20-POLY1305:ECDHE-ECDSA-AES128-GCM-SHA256:ECDHE-RSA-AES128-GCM-SHA256:ECDHE-ECDSA-AES256-GCM-SHA384:ECDHE-RSA-AES256-GCM-SHA384:DHE-RSA-AES128-GCM-SHA256:DHE-RSA-AES256-GCM-SHA384:ECDHE-ECDSA-AES128-SHA256:ECDHE-RSA-AES128-SHA256:ECDHE-ECDSA-AES128-SHA:ECDHE-RSA-AES256-SHA384:ECDHE-RSA-AES128-SHA:ECDHE-ECDSA-AES256-SHA384:ECDHE-ECDSA-AES256-SHA:ECDHE-RSA-AES256-SHA:DHE-RSA-AES128-SHA256:DHE-RSA-AES128-SHA:DHE-RSA-AES256-SHA256:DHE-RSA-AES256-SHA:ECDHE-ECDSA-DES-CBC3-SHA:ECDHE-RSA-DES-CBC3-SHA:EDH-RSA-DES-CBC3-SHA:AES128-GCM-SHA256:AES256-GCM-SHA384:AES128-SHA256:AES256-SHA256:AES128-SHA:AES256-SHA:DES-CBC3-SHA:!DSS'
          prefer_server_ciphers: yes
          session_cache: shared:le_nginx_SSL:1m
          session_timeout: 1440m
        autoindex: false
        client_max_body_size: 50m
        reverse_proxy:
          locations:
            backend:
              location: /
              proxy_pass: http://127.0.0.1:2368
              proxy_set_header:
                header_host:
                  name: Host
                  value: $http_host
                header_x_real_ip:
                  name: X-Real-IP
                  value: $remote_addr
                header_x_forwarded_for:
                  name: X-Forwarded-For
                  value: $proxy_add_x_forwarded_for
                header_x_forwarded_proto:
                  name: X-Forwarded-Proto
                  value: $scheme
        web_server:
          http_demo_conf: false
          locations:
            cert_challenges:
              location: '^~ /.well-known/'
              html_file_location: /var/certbot-challenges/
              autoindex: false
              client_max_body_size: 1m
      my_blog_http:
        listen:
          listen_all_ipv4_http:
            ip: '0.0.0.0'
            port: 80
          listen_all_ipv6_http:
            ip: '[::]'
            port: 80
        server_name: my_blog.example.com
        autoindex: false
        returns:
          return301:
            location: /
            code: 301
            value: https://$host$request_uri
The important thing to note here is that in line 35 we should use the same published port we've used in the docker container. This is particularly important if you have multiple sites hosted in the same place.
The generated configuration file looks like this:
server {
    listen 0.0.0.0:443 ssl http2;
    listen [::]:443 ssl http2;
    server_name my_blog.example.com;
    ssl_certificate /etc/letsencrypt/live/my_blog.example.com/fullchain.pem;
    ssl_certificate_key /etc/letsencrypt/live/my_blog.example.com/privkey.pem;
    ssl_protocols TLSv1 TLSv1.1 TLSv1.2;
    ssl_ciphers ECDHE-ECDSA-CHACHA20-POLY1305:ECDHE-RSA-CHACHA20-POLY1305:ECDHE-ECDSA-AES128-GCM-SHA256:ECDHE-RSA-AES128-GCM-SHA256:ECDHE-ECDSA-AES256-GCM-SHA384:ECDHE-RSA-AES256-GCM-SHA384:DHE-RSA-AES128-GCM-SHA256:DHE-RSA-AES256-GCM-SHA384:ECDHE-ECDSA-AES128-SHA256:ECDHE-RSA-AES128-SHA256:ECDHE-ECDSA-AES128-SHA:ECDHE-RSA-AES256-SHA384:ECDHE-RSA-AES128-SHA:ECDHE-ECDSA-AES256-SHA384:ECDHE-ECDSA-AES256-SHA:ECDHE-RSA-AES256-SHA:DHE-RSA-AES128-SHA256:DHE-RSA-AES128-SHA:DHE-RSA-AES256-SHA256:DHE-RSA-AES256-SHA:ECDHE-ECDSA-DES-CBC3-SHA:ECDHE-RSA-DES-CBC3-SHA:EDH-RSA-DES-CBC3-SHA:AES128-GCM-SHA256:AES256-GCM-SHA384:AES128-SHA256:AES256-SHA256:AES128-SHA:AES256-SHA:DES-CBC3-SHA:!DSS;
    ssl_prefer_server_ciphers on;
    ssl_session_cache shared:le_nginx_SSL:1m;
    ssl_session_timeout 1440m;
    client_max_body_size 50m;

    location / {
        proxy_pass http://127.0.0.1:2368;
        proxy_set_header Host $http_host;
        proxy_set_header X-Real-IP $remote_addr;
        proxy_set_header X-Forwarded-For $proxy_add_x_forwarded_for;
        proxy_set_header X-Forwarded-Proto $scheme;
    }

    location ^~ /.well-known/ {
        root   /var/certbot-challenges/;
    }
}
server {
    listen 0.0.0.0:80;
    listen [::]:80;
    server_name my_blog.example.com;

    location / {
        return 301 https://$host$request_uri;
    }
}
Backing Up The Content
In order to backup the blog's content the only thing that needs to be done is copying the contents of the /contents directory within the base directory used to configure the role.
How you do that is up to you. If you have a dropbox account, a simple way is using the backup-to-dropbox tool along with a cronjob that runs at a certain frequency.
Conclusion
This is a very rough guide on how to setup a blog end-2-end. I didn't get much into the details of each step but should be more than enough for someone to get started and manage to set everything up. Especially if they are leveraging ansible and the already developed roles.
If you want to put your word out there, get a VPS and setup a simple ghost site. It is not difficult and owning your platform is the only way of being sure that you don't get censored in the times we are currently living.